Z-turn-Board-V2-Diary
🌷 Creating (and compiling) a project 🌌
Outline:
- Create a project
- Do minor assisting configurations
- (x3).
- Build project
- Retrieve(package) boot files
🏛️(Create a new project):
We will not be using pre-configured settings. (This would be possible by using a bsp file).
(Thus, we will rely on templates).
- Create a new project, [specific to our logic design]:
$ petalinux-create --type project --template zynq --name my_project
$ cd my_project - Configure according to the logic design:
$ petalinux-config --get-hw-description path/to/exported/design_1_wrapper.xsa --silentconfig
^ This should be run only once, because it initializes. Any subsequent configurations, should be through$ petalinux-config(w/o params).
🏛️(menuconfig: Cache)
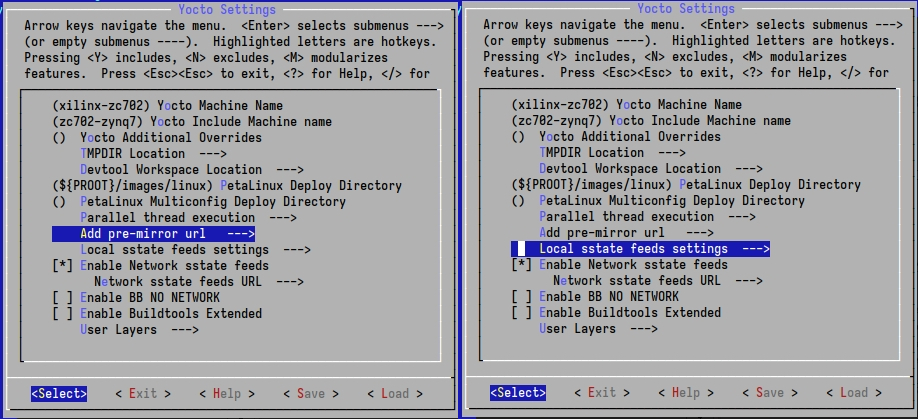
To save download time, we can download various caches. There are two of them, the “download” and the “sstate” one. Namely, under the PetaLinux Tools sstate-cache Artifacts, the following can be downloaded:
- “arm sstate-cache”, and
- “Downloads”
Extract both of them and note the destination paths like so:
- downloads_path:
file:///path/to/downloads/inner/downloads/folder - sstate_path:
/path/to/sstate/top/arm/folder
^ (Absolute paths may be needed)! (Instead of relative ones).
To set them:
- Open
menuconfig:$ petalinux-config - copy downloads_path to
Yocto-settings ⟶ Add pre-mirror URL, and - sstate_path to
Yocto Settings ⟶ Local sstate feeds settings:

🏛️(menuconfig: New partition)
(Instead of loading Linux onto [board’s] RAM (default/image.ub)),
We will install, Linux, directly onto the SD(ext4) card.
- Open
menuconfig:$ petalinux-config Image Packaging Configuration ⟶ Root filesystem type ⟶ EXT4
^ (This will automatically affect other [configuration] areas).

🏛️(menuconfig: Extra(threads))
Yocto Settings ⟶ Parallel thread execution

🏛️(menuconfig: Extra(auto-login))
(As per reference), Open the rootfs configuration:
$ petalinux-config -c rootfs
Image Features ⟶ serial-autologin-root

🏛️(SD read-write):
In order to not boot read-only, we’ll need a device tree specification.
Taken from the original source code, we’ll adapt the device tree specifications (files system-user.dtsi and zturn-pl-hdmi.dtsi (the .dtsi stands for Device Tree Source Include)), too isolate the SD part: (and adapt the system-user.dtsi file):
my_project/project-spec/meta-user/recipes-bsp/device-tree/files/system-user.dtsi:
/include/ "system-conf.dtsi"
/ {
    aliases {
		mmc0 = &sdhci0;
	};
};

&sdhci0 {
	status = "okay";
	disable-wp;
	// wp-inverted;
};
🏛️(Build the project):
$ petalinux-build
^ (Note: You may wanna save thebuild/downloadsfolder to reduce download times).
🏛️(Package the boot images):
FIXME: Why?
- Prepare the boot images, including the bitstream, using:
$ petalinux-package --boot --u-boot --fpga project-spec/hw-description/design_1_wrapper.bit
^ The important part is (--fpga path/bit) to include the bitstream.
_ Amongst the errors, are inability to find the interrupt controller (boot hang).
Note:project-spec/hw-description/design_1_wrapper.bitis updated after$ petalinux-config, whereasimages/linux/system.bitmay not be updated
- This will create the:
BOOT.BIN,boot.scr,image.ubfiles which contain the bootloader (?), the (?) [reference] and the kernel, along with:rootfs.tar.gz, which will be extracted onto the SD.
Note(corrections)
As per the tutorial:
boot.scris the script that U-Boot reads during boot time to load the kernel and rootfsimage.ubcontains kernel image, device tree and rootfs
Thus, up to the previous chapter, the ext4 (where the rootfs.tar.gz was extracted) was not being used 🙊!
Boot:
As per reference:
- Copy the
BOOT.bin,boot.scrandimage.ubfiles into aFAT32partition of the SD card
(Preferably, the FAT32 is (at least (?)) 4MiB after the start). - Extract
rootfs.tar.gzinto anext4partition
(You can monitor the boot process with picocom or CuteCom).
Various troubleshooting from the internet:
- Some fixed by reinstalling petalinux
- Petalinux 2023.2 known issues (site)
Referencies
- UG1144: PetaLinux Tools Documentation: Reference Guide (site)
- [The original] Source code (chinese site)
- Add EXT4 rootfs support (tutorial)